Identity Server 4 从入门到落地(八)—— .Net Framework 客户端
前面的部分:
Identity Server 4 从入门到落地(一)—— 从域名n开始
Identity Server 4 从入门到落地(二)—— 理解授权码模式
Identity Server 4 从入门到落地(三)—— 创建Web客户端
Identity Server 4 从入门到落地(四)—— 创建Web Api
Identity Server 4 从入门到落地(五)—— 使用Ajax 访问 Web Api
Identity Server 4 从入门到落地(六)—— 简单的单页面客户端
Identity Server 4 从入门到落地(七)—— 控制台客户端
认证服务和管理的github地址: https://域名/zhenl/IDS4Admin
客户端及web api示例代码的github地址:https://域名/zhenl/IDS4ClientDemo
在面向企业的信息化项目中,很少有项目是从一张白纸开始,或多或少都要面临与现有项目集成或者遗留项目升级与整合的问题,认证服务的使用更是如此,各种现有系统的单点登录就是认证服务常用的场景之一,因此,如果遗留系统无法使用,那么这个技术在项目中就无法落地使用。现实中仍然存在大量在用的基于.Net Framework的项目,我们需要为这些项目制订与认证服务集成的方案。我们通过创建一个.Net Framework 4.5.2的简单应用来验证方案的可行性,主要使用的技术是采用Owin实现OpenIdConnect的客户端,构建过程如下。
首先,在我们现有的测试解决方案中增加一个域名 MVC项目,采用.Net Framework 4.5.2框架,项目名称为IDS4ClientNet4。
然后,在项目中引入如下程序包:
IdentityModel
域名
域名.SystemWeb
接下来,在项目中增加域名文件,代码如下:
using IDS4ClientNet4;
using 域名域名IdConnect;
using 域名;
using 域名域名ies;
using 域名域名IdConnect;
using Owin;

using 域名;
using 域名ms;
using 域名s;

[assembly: OwinStartup(typeof(Startup))]
namespace IDS4ClientNet4
{
    public class Startup
    {
        public void Configuration(IAppBuilder app)
        {
            域名ookieAuthentication(new CookieAuthenticationOptions
            {
                AuthenticationType = "Cookies"
            });

            域名penIdConnectAuthentication(new OpenIdConnectAuthenticationOptions
            {
                Authority = "http://localhost:4010",
                ClientId = "net4mvcclient",
                ClientSecret = "secret3",
                RedirectUri = "http://localhost:49816/signin-oidc",//Net4MvcClient\'s URL

                PostLogoutRedirectUri = "http://localhost:49816",
                ResponseType = "id_token token",
                RequireHttpsMetadata = false,

                Scope = "openid profile myapi",

                TokenValidationParameters = new 域名域名nValidationParameters
                {
                    NameClaimType = "name"
                },

                SignInAsAuthenticationType = "Cookies",

                Notifications = new OpenIdConnectAuthenticationNotifications
                {
                    SecurityTokenValidated = n =>
                    {
                        域名域名laim(new Claim("access_token", 域名ssToken));
                        域名域名laim(new Claim("id_token", 域名ken));

                        return 域名Result(0);
                    },
                    RedirectToIdentityProvider = n =>
                    {
                        if (域名estType == 域名ut)
                        {
                            var id_token_claim = 域名域名域名tOrDefault(x => 域名 == "id_token");
                            if (id_token_claim != null)
                            {
                                域名kenHint = 域名e;
                            }
                        }
                        return 域名Result(0);
                    }
                }

            });

        }
    }
}
注意,这里使用的ResponseType是id_token token,不是code。
修改HomeController,将About设置为[Authorize],增加访问WebApi和Logout功能:
using 域名;
using System;
using 域名ric;
using 域名;
using 域名;
using 域名.Headers;
using 域名ms;
using 域名s;
using 域名;
using 域名;

namespace 域名rollers
{
    public class HomeController : Controller
    {
        public ActionResult Index()
        {
            return View();
        }

        [Authorize]
        public ActionResult About()
        {
            域名age = "Your application description page.";

            return View();
        }

        public async Task<ActionResult> WebApi()
        {
            var user = User as ClaimsPrincipal;
            var accessToken = 域名First("access_token").Value;

            var client = new HttpClient();
            域名orization = new AuthenticationHeaderValue("Bearer", accessToken);
            var response = await 域名sync("http://localhost:5153/WeatherForecast");
            string content;
            if (!域名ccessStatusCode)
            {
                content = await 域名AsStringAsync();
                域名 = content;
            }
            else
            {
                content = await 域名AsStringAsync();
                域名 = 域名e(content).ToString();
            }

            return View();
        }

        public ActionResult Logout()
        {
            域名域名winContext().域名Out();
            return Redirect("/");
        }
    }
}
About的视图域名ml如下:
@using 域名ms;
@{
    域名e = "About";
}
<h2>@域名e.</h2>
<h3>@域名age</h3>

<p>Use this area to provide additional information.</p>
<dl>
    @foreach (var claim in (User as ClaimsPrincipal).Claims)
    {
        <dt>@域名</dt>
        <dd>@域名e</dd>
    }
</dl>
视图域名ml如下:
<pre>@域名</pre>
下面需要使用认证管理应用增加一个客户端,名称为net4mvcclient,Client Secret为secret3。需要注意的是,这个客户端需要设置为隐式模式(Implicit)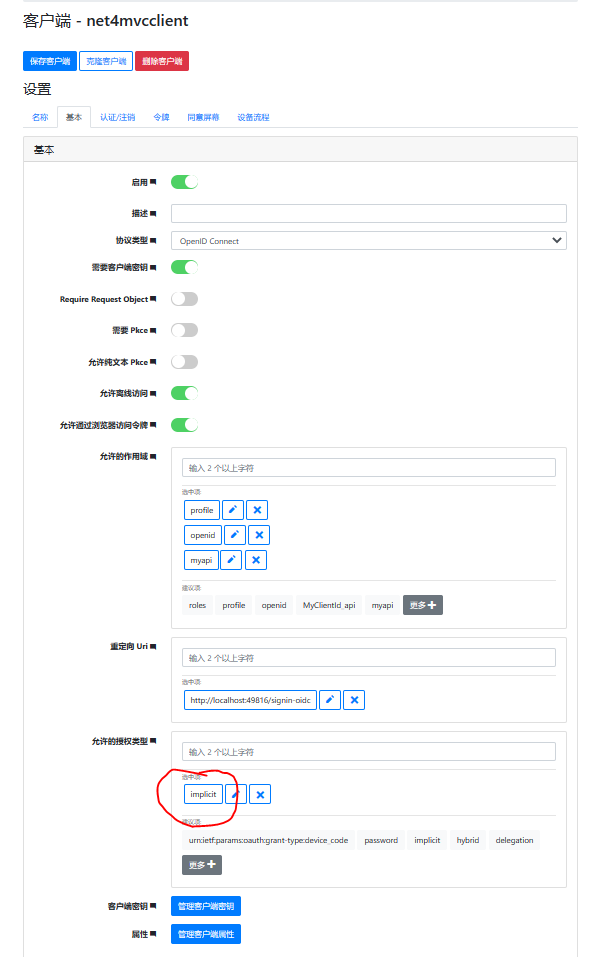
设置完成后,将解决方案的启动项目设置为多项目启动,同时启动客户端和Web Api:
启动项目,访问关于页面,会跳转到认证服务的登录页面,登录完成后,会显示用户的详细信息。访问WebApi页面,可以获取Api返回的数据:
通过这个项目我们验证了.Net Framework与认证服务集成的方案。


![[云原生]Docker - 安装&卸载](/upload/image/20211208/aHR0cHM6Ly9pbWcyMDIwLmNuYmxvZ3MuY29tL2Jsb2cvMTk1MzQwOC8yMDIxMTIvMTk1MzQwOC0yMDIxMTIwODE0NTEwNDc2Mi0xMzc4MDMxMzIwLnBuZw==.png "[云原生]Docker - 安装&卸载")